
3 Tips for Multiple Exposure Photography
Multiple exposures are my go-to technique for getting epic wedding images quick, fast and in a hurry. I mean let’s be honest, sometimes the wedding venue is just plain boring, and other times we don’t have more than just a few minutes to get the shots we need. The only thing about a wedding day that is for sure, is that is it our responsibility to get amazing images, every single wedding, regardless of the circumstances. For me, that is where multiple exposures come in. I can do them anywhere, anytime, with any client and usually get a pretty amazing image no matter the circumstances. In this article, I wanted to go over 3 ways that you can use multiple exposures to create some truly unique images that will blow your clients minds!
Technical stuff
I do all of my multiple exposures in camera using Nikon’s “Image Overlay” feature that can be found in the retouch menu of nearly every Nikon camera. Canon and Sony cameras should have something very similar. You can also do these in photoshop after the fact, however, I prefer to do them in camera.
Shift White Balance
As the name implies, when doing a multiple exposure you are just combining 2 or more exposures into a single image. You can add a ton of visual interest to your multiple exposure by using different white balances between each frame to create a strong color that otherwise would not exist.

For example, this image is made up of two exposures, the first exposure is of the bokeh which was originally just a white color. I shifted my cameras white balance to 2500K, forcing the camera to introduce the blue color into the exposure. Then the second exposure was the silhouette which I created uses the Magmod Creative Orange Gel, I used the orange gel knowing that the orange would contrast nicely with the blue bokeh.
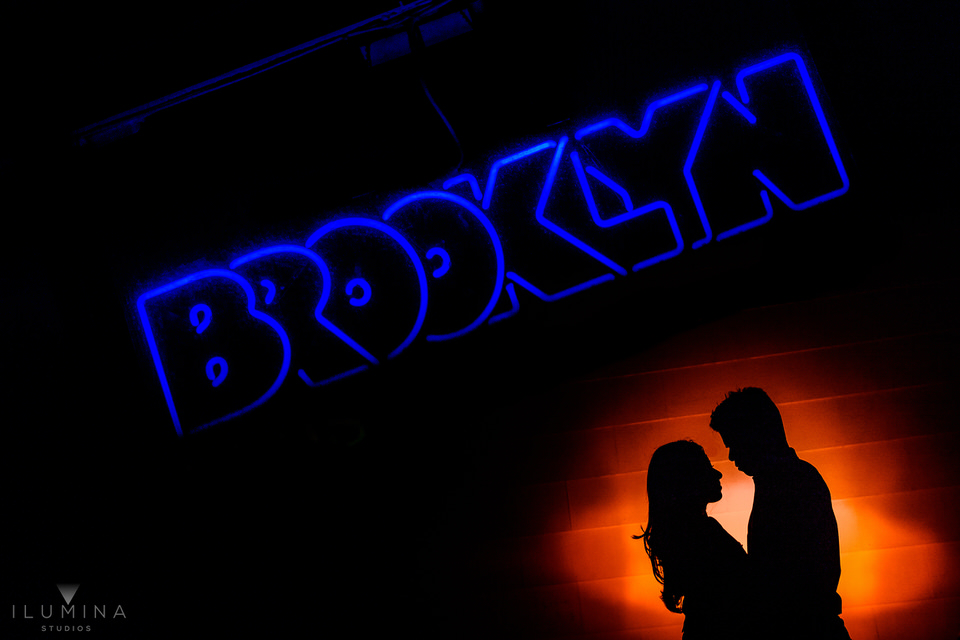
Similarly, I used a 2,500K white balance to make the Brooklyn sign as blue as it could go in order to color contrast as much as possible with the orange silhouette.
Try JPEGmini Pro For Free Now!
Mixing Focal Lengths
Very similar to shifting while balance to add color, you can vary your focal lengths between exposures to force perspective in ways that add a ton of visual interest and might otherwise be impossible without the use of multiple exposures.
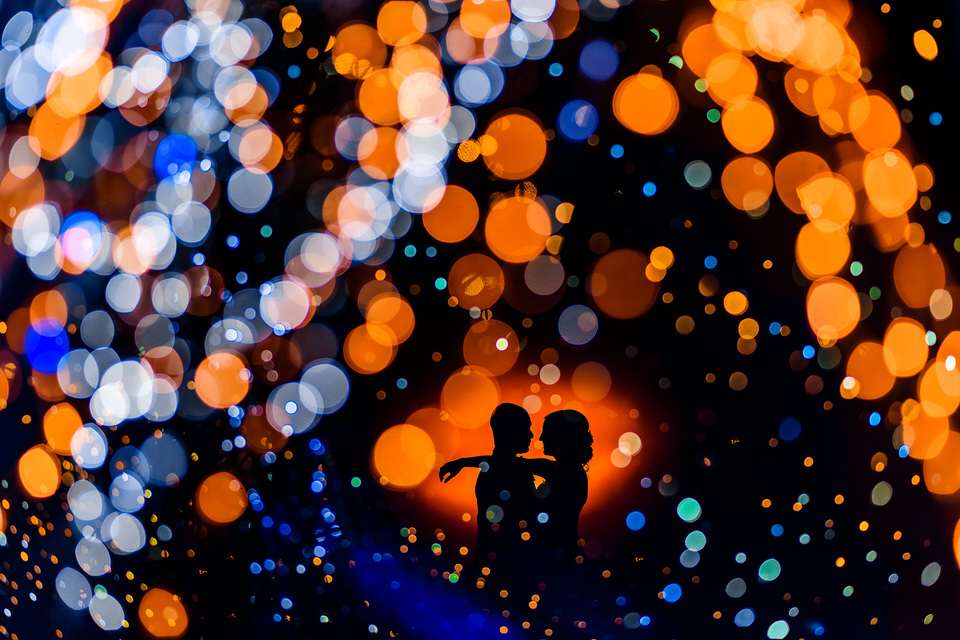
This photo was actually five exposures combined into one. Four of those exposures were of the bokeh and the fifth exposure was of the couple. This is an example of both mixing the focal length between exposures and also mixing the white balance between exposures. The first exposure was with my camera set to 10,000K white balance and zoomed in to 200mm, the second exposure was 10,000K at 70mm, the third exposure was 2,500K white balance at 200mm, the fourth exposure was 2,500K at 70mm, and then finally the fifth exposure was the silhouette taken against a clean white wall and colored using the creative orange mag gel.
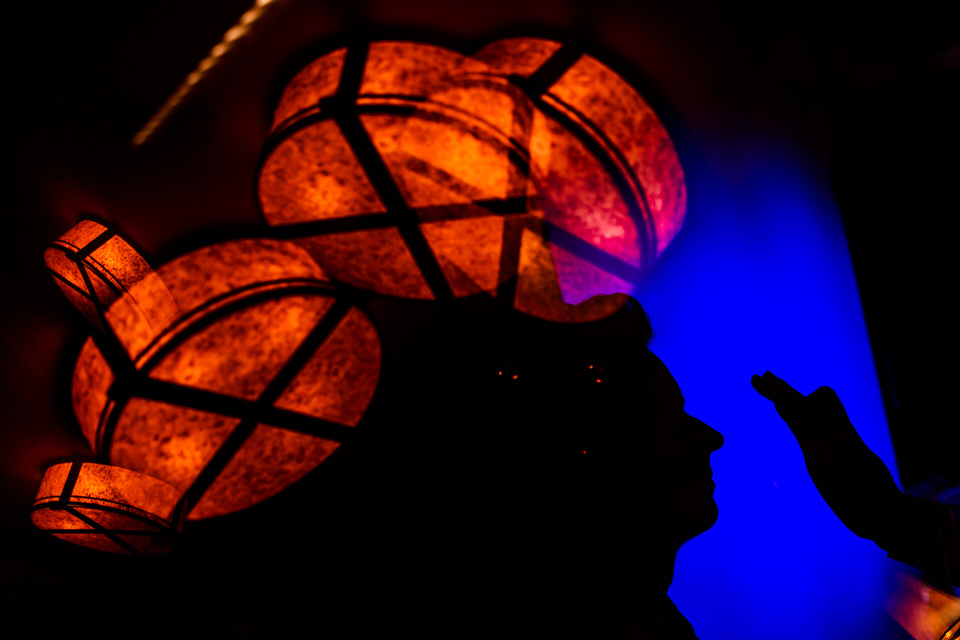
This image was created by combing 6 exposures. The first exposure was the silhouette of the bride getting ready, the second, third, fourth, fifth and sixth exposures were all created in the hallway outside of the room where the bride was getting ready. The hallway was lined with these cool looking lights so I shifted my white balance to 10,000K and then took 5 exposures with each exposure being a different focal length, and tilting my camera in different directions creating an abstract grouping of lights. While photographing the lights I made sure to think about where the first exposure was going to go within the final image and made sure to keep that area as clean as possible knowing that I was going to put the image of the bride there.
Use it to help tell the story
Another really cool thing about multiple exposures is that you can use them to your advantage when it comes to telling the story of a wedding day. You can include multiple visual elements from various scenes and combine them in a way that contributes to the story.
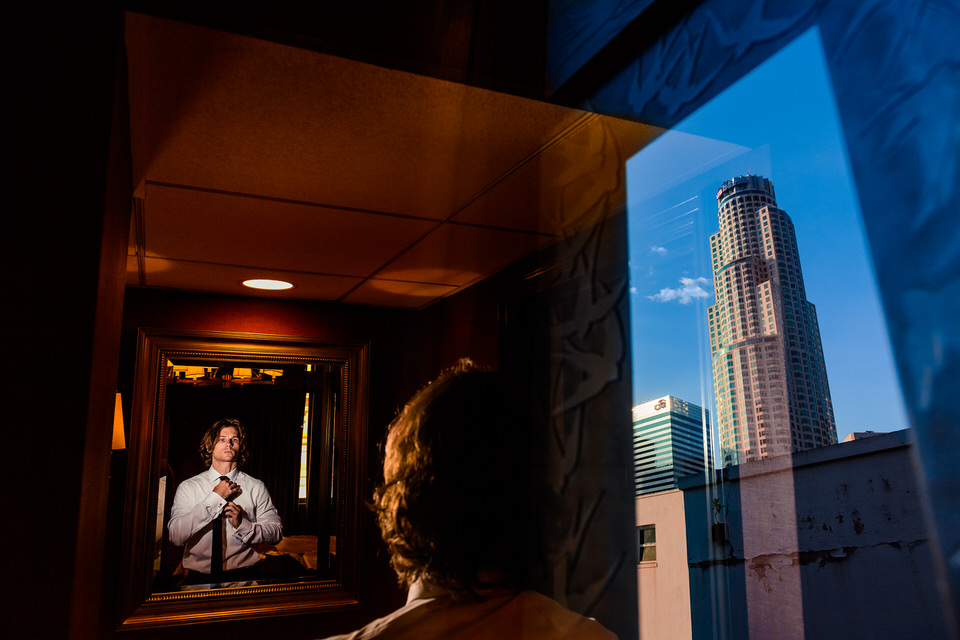
In this photo, I’ve been able to not only create an interesting photo using multiple exposures but also contribute to the story of the image by including the iconic U.S. Bank Tower building in downtown Los Angeles. By adding in that element it adds another layer of interest to the image because it allows the viewer to infer not only what is happening in the image, but also where and when the image was taken. *Also note the white balance differences between each exposure 😉
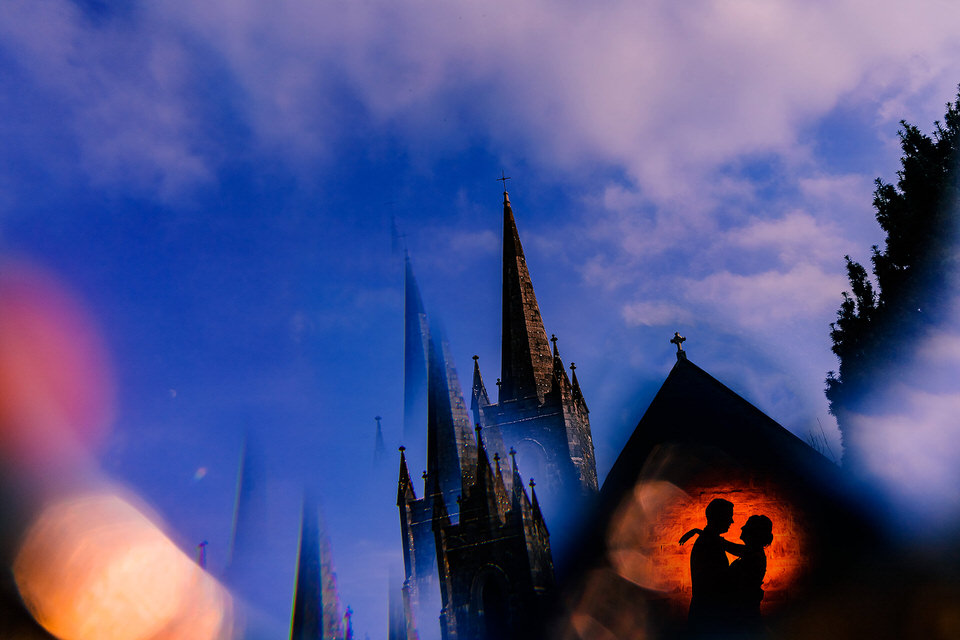
Another example of using location to contribute to the story of the image. The first exposure in this image was of the church where this couple got married. The second exposure was a simple silhouette of the couple created using the Orange Creative MagGel.
Conclusion
Multiple Exposures are extremely powerful in that they are very flexible, they can easily be pulled off in even the most difficult situations and if done well, can be another trick up your sleeve that you can use to make sure you never walk away from a shoot without something amazing.
Want to learn more?
I have written an entire ebook on how I do multiple exposures and I am offering a special discounted price of $9.99 to jpeg mini blog readers. This nearly 60-page ebook is packed with everything you need to know about doing multiple exposures, every tip, trick, and technique I know will be at your disposal. You can learn more about the ebook HERE.
Carsten is a formerly homeless teenager turned wedding photographer based in Los Angeles, California. When not shooting weddings you can find Carsten teaching lighting workshops, speaking at conferences, or skateboarding. To learn more about upcoming workshops click HERE, to watch Carsten shoot an engagement session click HERE, or to follow him on Instagram click HERE.