6 Easy Steps to Creating a Simple but Effective Google Adwords Search Marketing Campaign
I’m a big advocate of paid search activity, but I recognise that it’s part of a balanced approach to your website traffic and not the silver bullet that will drive your bookings for the year.
As much as paid search plays a role for me, I still believe that investing time in on-site SEO (building your website pages to rank highly on search sites) and off-site SEO (optimising your website for relevance, trustworthiness, and authority) is your primary and longer-term traffic driving goal.
That said, if you wanted to try paid search advertising for your business this simple step guide will help you put in place quick and effective campaign.
I’m going to assume that you’ve set up an account on AdWords, but if you haven’t visit https://adwords.google.com to set up your account.
Step 1. Select your campaign type
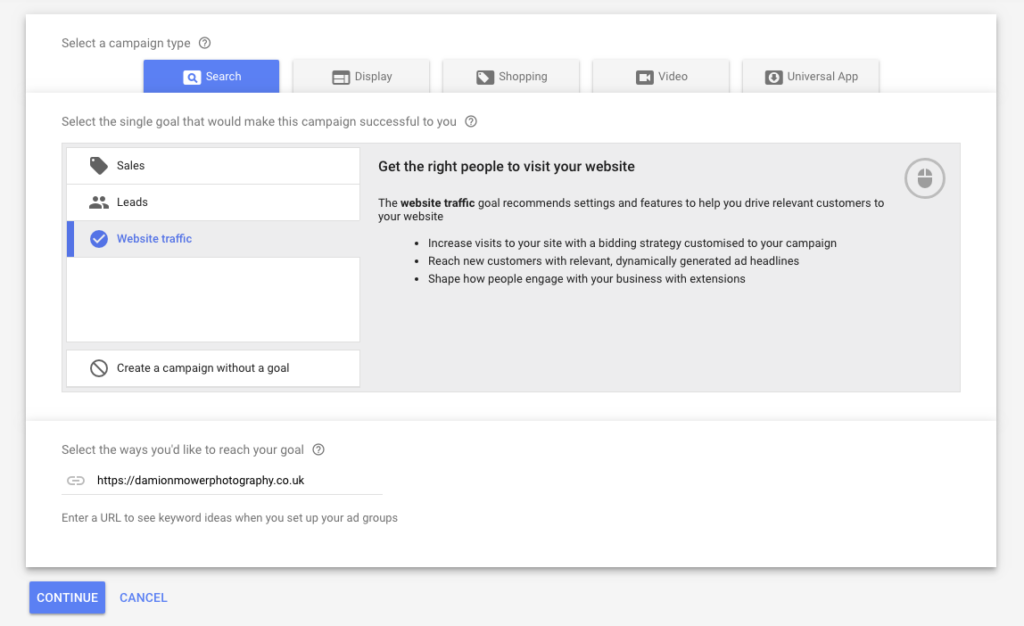
Your first choice is to select the campaign type you wish to use. AdWords gives you a great choice of mediums where your customers can see you, but for our purposes, I recommend a ‘search’ campaign as your starting point. Make sure you’ve selected ‘search network only’.
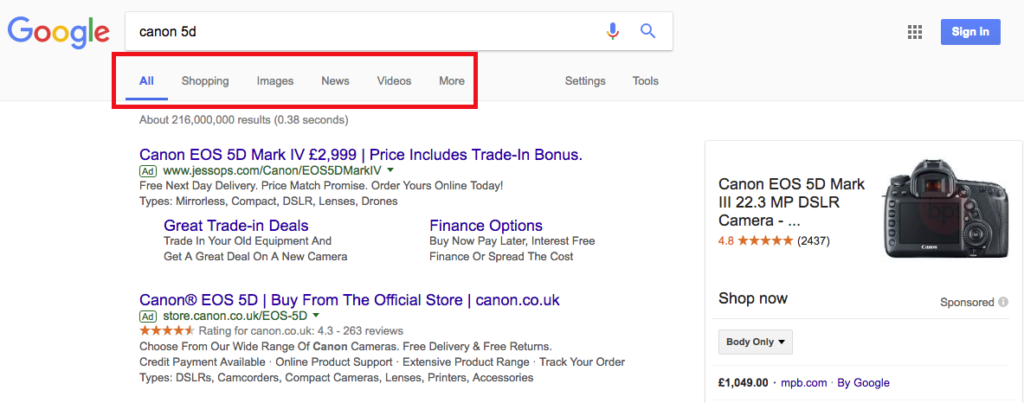
This means your advert will appear as text style ads across the Google search network results pages and not on their display (banner promotions), shopping, video or app networks. If you wanted to see what I mean by this, google your camera brand and look along the top bar for the refined search options like ‘shopping’ or ‘videos’.
Step 2. Select your goal
AdWords now presents you with some objectives for your campaign at this stage, I recommend selecting ‘website traffic’.
It’s tempting to click sales or leads, but these objectives are really focused on retailers or for an audience that knows exactly what they want to do next, for instance booking a concert ticket or buying some shoes. By choosing ‘website traffic’ you’re giving yourself the best chance to drive relevant customers to your website and get them to see your portfolio.
Once you’ve clicked ‘website traffic’, you will then be asked to submit your website domain address.
Try JPEGmini Pro For Free Now!
Step 3. Building your campaign
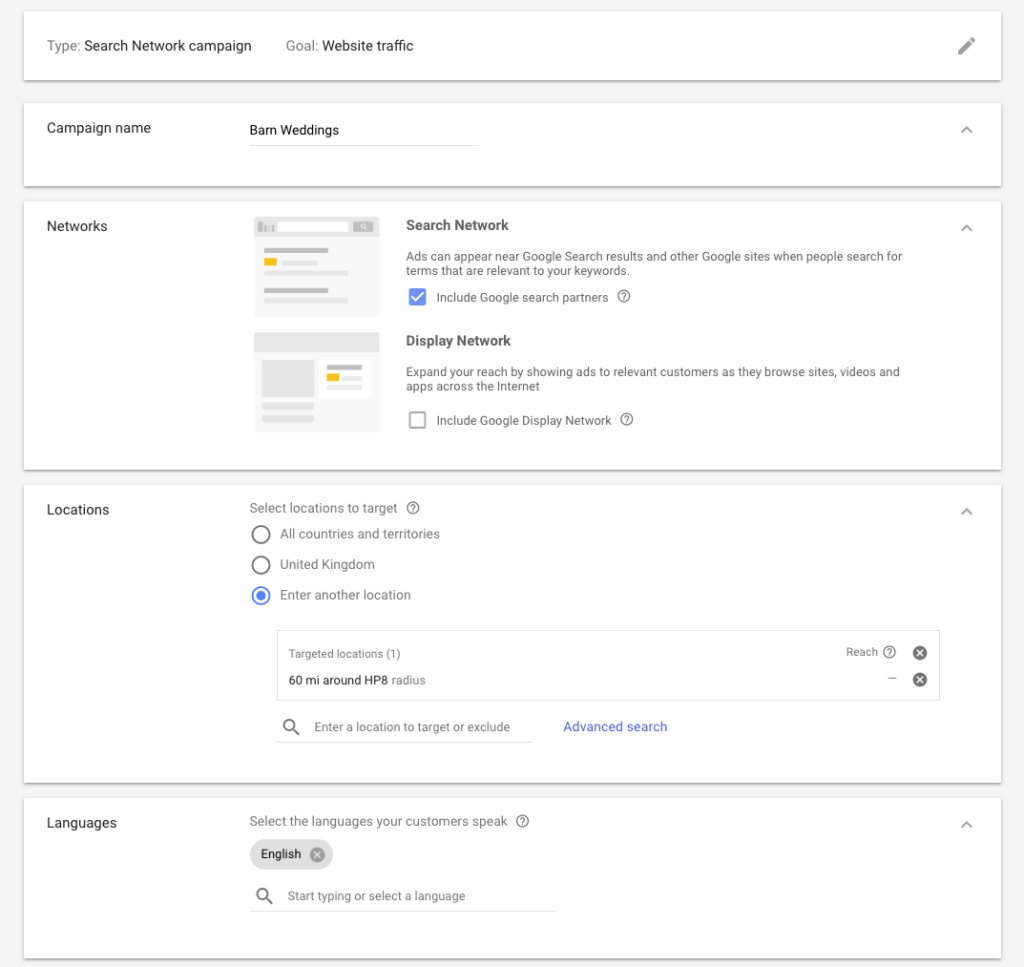
Give your campaign a name, something that you will identify should you later decide to have more than one campaign.
Important note. Make sure that you untick ‘include Google Display Network’ from your campaign build. As mentioned previously it’s not required for a simple advertising campaign and could significantly impact your campaign performance and effectiveness.
You should still have a tick in the checkbox that says ‘Include Google search partners’.
Geographic locations
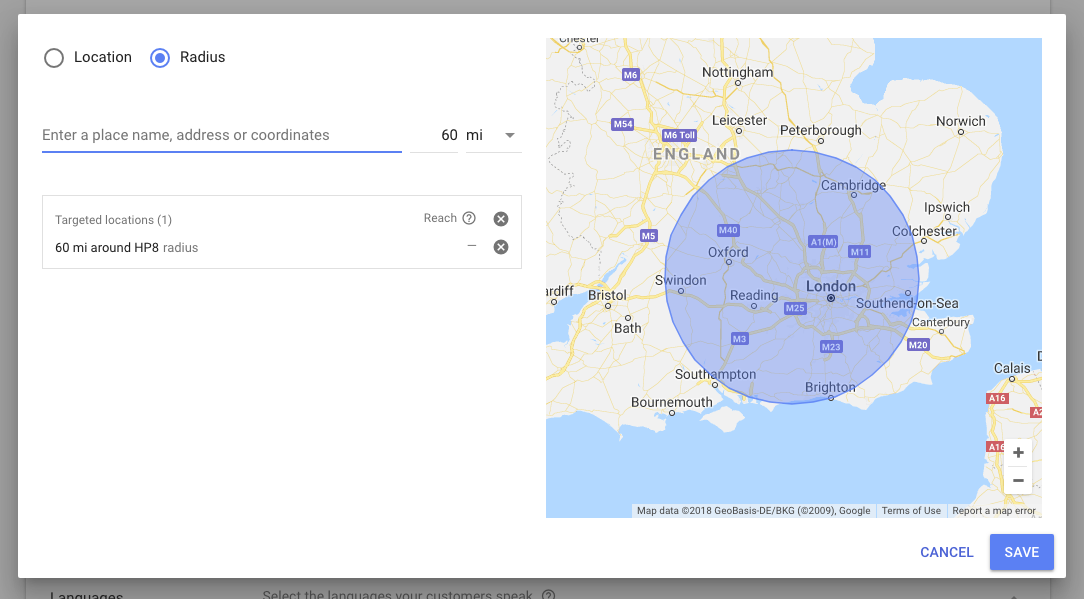
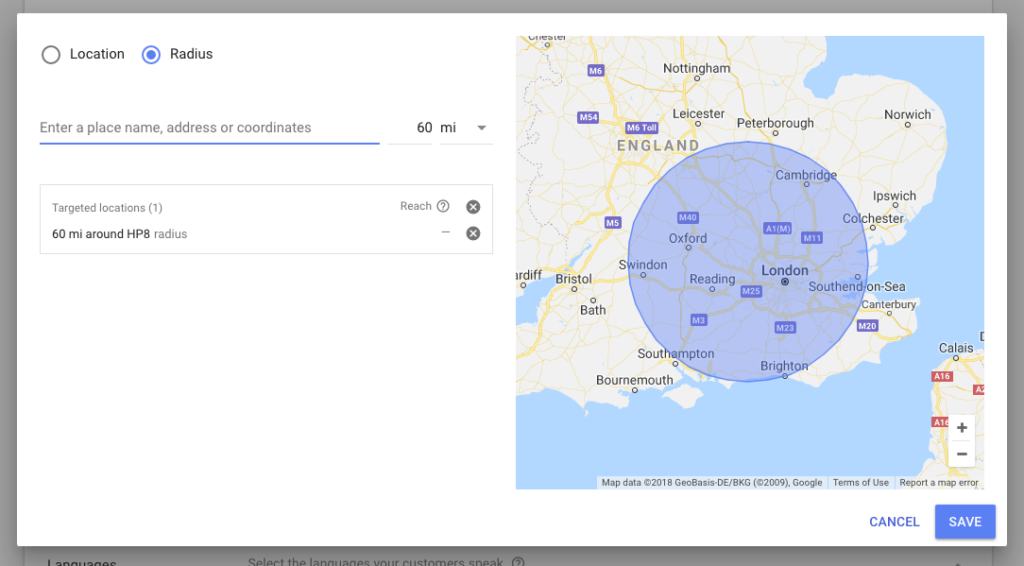
Now we need to choose the geographic location of where you would like your ad to show. This really depends on how far and wide you want to travel for your business. I personally limit my location to people who live within a 60-mile radius of my home, simply because as a wedding photographer that’s where I want to be capturing weddings. To do this, click on ‘Enter another location’ and then ‘Advanced search’.
You will be presented with a pop-up screen. Click on ‘Radius’ and enter your postcode or location along with the radius in miles or km. You will see a handy map on the right-hand side that will show you your reach from the desired location…keep editing it until you are happy, then save.
Language
Pick your language. For my limited linguistic skills this stays as ‘English’ but by all means, add in any of your native tongues or learned languages.
Budget
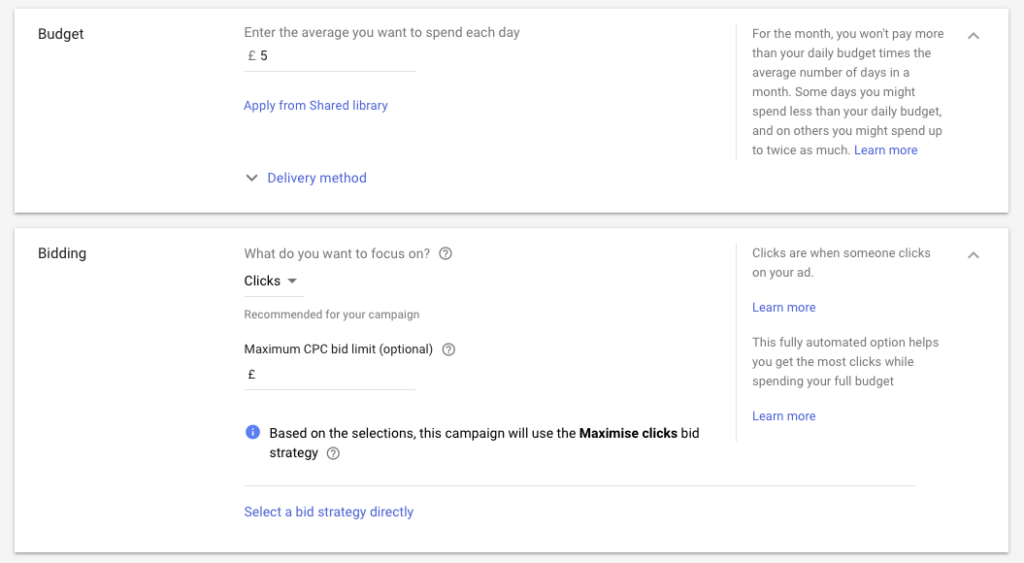
Now onto the biggie…your budget. I strongly advise to start low and work your way up to a budget that you are a) comfortable with and b) returns the number of clicks and conversions that make it profitable for you to earn leads via this route. As a suggestion start with £5 per day. (Ignore any prompts for shared library or accelerated delivery methods.)
Your daily budget is the maximum that Google is authorised to charge you per day. Chances are, you’ll hit that maximum most days.
Bidding
Bidding methods offer you a number of objectives based on your desired campaign outcome. My objective is to get clicks and visitors to my site, so I choose ‘clicks’. At this stage, you can either choose a maximum cost per click (CPC), which is essentially how much you are willing to give to google each time someone clicks on your advert. Remember that you’re in competition for clicks with other photographers so you’ve two options. 1) let Google optimise your cost per click for you, based on what other people are bidding, or 2) manage it yourself. Perhaps a good option is to let Google manage it for a few weeks and then take-over yourself when you’re more familiar with the cost of each keyword, in which case leave this section blank.
Lastly, you can set start and end dates, opt for dynamic search ads and choose your site extensions. These are an important part of your ad structure and worth adding in once you’ve built your campaign, but for the purposes of getting a simple ad we will ignore them for now. Don’t forget to go back and edit them later though.
Click Save and Continue!
Step 4. Setting up your Ad Groups
It’s important to understand what Google means by an Ad Group, and it will enable you to better manage multiple Ad Groups for your business. I see Ad Groups as a way of grouping a topic or area I want to advertise around and as a wedding photographer looking for business this is typically either venues, counties or a style of wedding I would like to secure.
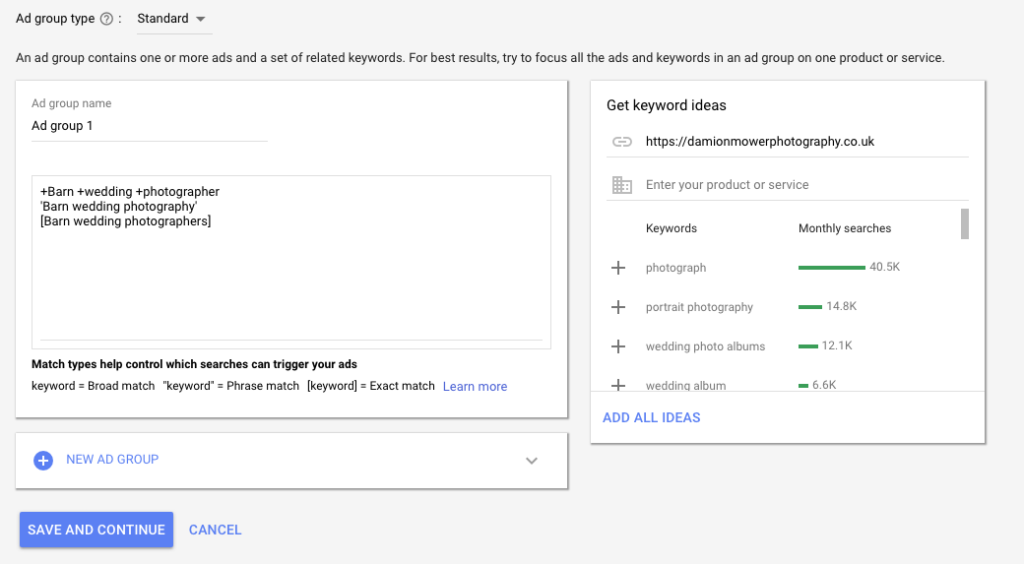
Leaving the Ad Group type as ‘Standard’, give your Ad Group a name and then spend some time thinking about the types of terms that your audience will be searching for within this topic area – these are called keywords and will trigger your advert. For instance, if we used the example of an Ad Group called ‘Barn Weddings’, you might expect that the keywords people would search for in this category would be:
• Barn wedding photographer
• Barn wedding photography
• Barn wedding photographers
If you’re stuck for inspiration then Google offer you some keyword ideas at this stage. My advice is to keep this simple and don’t be tempted to dump lots of keywords in just yet, keep focussed, learn and build over time.
Keyword matching
One very important point to get right here is your choice of keyword matching. Google offers several options to help you control your searches and ensure that you trigger ads when you want to present them. In a nutshell, there are 4 choices:
• Broad Match
- Keywords using this match type will find ads presented when people misspell, use synonyms or have related searches. As it says on the tin, it’s the broadest way to match your keyword and will get you lots of clicks. Just be sure they’re all relevant!
- If you choose this match type all you need to do is write your keyword as you would like it to appear in the search bar.
• Broad Match Modifier
- You can target a little tighter with this match type by ensuring that synonyms are excluded
- If you choose this match type all you need to do is write your keyword and put a ‘+’ next to the keyword e.g. +Barn +wedding +photogrpaher.
• Phrase Match
- This match type ensures that ads are only shown on searches that match your keywords but will include phrases e.g. best Barn wedding photographer.
- If you choose this match type all you need to do is write your keyword and put a “
around the keyword, e.g. “Barn Wedding Photographer”.
• Exact Match
- As you’ve probably guessed, this covers exactly matched keywords, in any order.
- If you choose this match type all you need to do is write your keyword and put a
[bracket] around the keyword, e.g. [Barn Wedding Photographer].
It’s entirely up to you but I would urge to start narrow and broaden out, so pick phrase match and see how this limits your searches.
Step 5. Creating your ads
Finally, onto the fun bit, creating your ads.
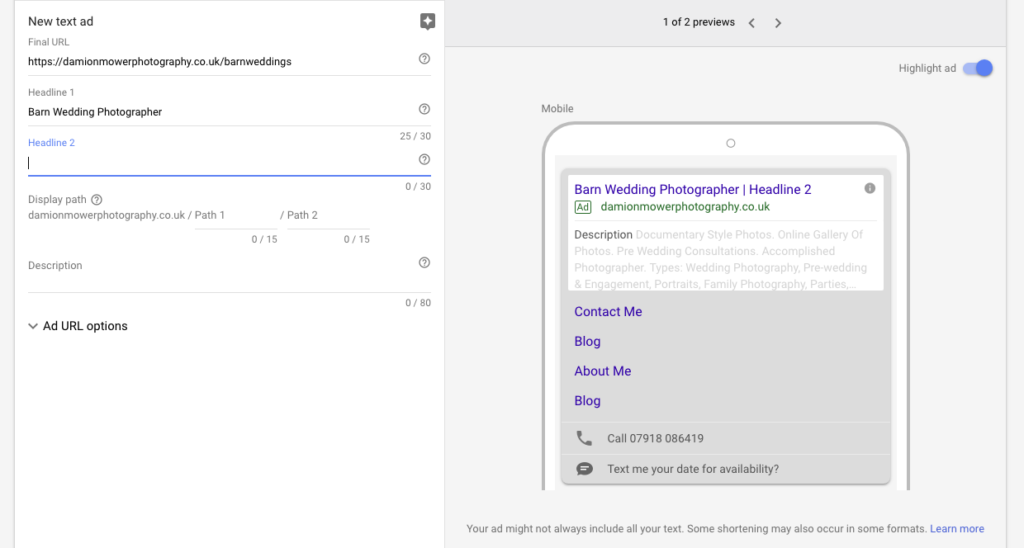
We start with the web link you want people to land on after clicking the advert. It’s fine to use your home page here but think about whether there is a more relevant place you could take traffic, with more specific content about their search. This will help the quality score for your ad, meaning its more relevant and useful to your audience. In my Barn wedding example, it would be better to take the customer to a page about Barn weddings I have shot, than my home page.
Next, we’re onto the headline for your ad. People like to click on headlines that include a keyword they have searched for, so try and build headlines that draw the customer in. You only have 30 characters so use the space carefully. Google will show you what the headline looks like in its ad image generator.
The second line (headline 2) allows you another 30 characters to expand on your first headline – use this as a way of showing some benefits of your business or perhaps an offer.
Finally, the third section is the ‘Description’ and offers you a whopping 80 characters to really land your proposition and why people should click and find out more about your business.
For simplicity, we’re going to ignore any additional Ad URL options and go straight to save and continue.
Step 6. Review and run
This last step asks you to confirm your campaign settings and gives you the opportunity to edit anything you’re not 100% comfortable with. You can preview your ad here as well.
Once you are comfortable click on OK and you’re done. Your campaign will usually go live within a few minutes or if it needs checking by Google a few hours.
Key to making Google AdWords a success is regular monitoring and optimisation of your ads. Introduce at least 3 ads into each Ad Group, and establish what ad performs the best for you, optimising against this ad. Spend time monitoring your cost per clicks and understanding what cost brings you the best return from which keywords, you can keep testing, removing and introducing keywords until you have got to a range you’re happy with.
Make sure you track your campaign though to either your booking page or your contact us page and don’t forget to revisit your ads and build your ad extensions, giving your audience more reasons to choose your business.
Good luck and good clicks.

